
Where to use these instructions
Epson scanners and Photoshop can be found in the Founders faculty resource room (FND 419), the MiniFocus, the Science Center faculty resource room (Cave), the Knapp Media and Technology Center, and the PNE Anthropology Lab.
Setting up
- Open the scanner cover and place your document face down on the scanner. The document should be placed so that its edges are against the top and right sides of the scanner. There is an arrow in the top right corner of the scanner to remind you.
- Close the scanner cover.
- Click on the Photoshop 7.0 icon in the dock(
 ) to launch the application. If there is no icon in the dock, you can also go to Macintosh HD > Applications > Adobe Photoshop 7 > Adobe Photoshop 7.0
- Open Epson TWAIN to scan. From the File menu, choose Import > EPSON TWAIN 5... .
- Once Epson Twain has opened, a preview scan begins automatically. If you see this window:
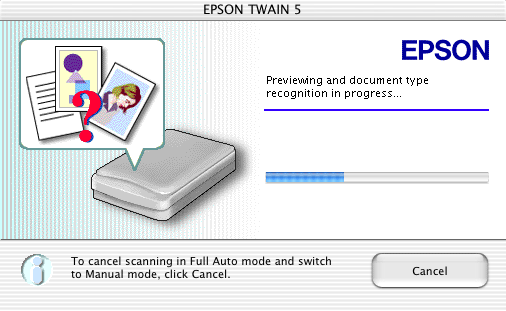
Click Cancel . Then choose Manual Mode...
A large dialog box full of options will appear. To begin a preview scan, click on the left button in the preview window:
Choose the image settings
- Image Type
- If you want to scan a color image set the Image Type to Color Photo .
- If you want to scan a black and white image
- Click on the Image Type button
- In the list of Image Types, select Black & White Photo .
- In the Pixel depth box, select 8-bit Gray .
- Click OK .
- Destination
- If you are scanning an image to be shown on a screen (for example: a web page or powerpoint presentation)
- Set the Destination to Screen, Screen Vivid or Screen/Web .
- Set the Resolution to 72
- If you are scanning an image to be printed on paper
- Set the Destination to Laser Printer .
- Set the Resolution to a number between 150-300 .
- 150 dots per inch is fine for most scans. Try this resolution first. If you find the results unsatisfactory, try increasing the resolution to 200 dots per inch. Note that file size increases significantly as you increase the resolution.
Note: See more information on Screen Resolution and why it is set to a lower number than Print Resolution.
- If you are scanning an image to be shown on a screen (for example: a web page or powerpoint presentation)
In the Image Preview window
- Adjust the selection area.
- Using the mouse, click and drag a rectangle around the area you want to scan.
- Click on the right button within the Preview box to zoom to the selected area.
- Adjust the selected area by resizing the box. To resize the box, allow the mouse to hover over an edge or corner of the box until arrows appear. Then click and drag to the correct size.
- Adjust the image settings.
- Click on the AUTO button to automatically adjust the brightness and contrast. If you prefer to do this manually, click on the first three buttons for more options. Click Reset to reset the image to its original settings.
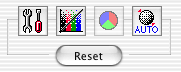
- Click on the AUTO button to automatically adjust the brightness and contrast. If you prefer to do this manually, click on the first three buttons for more options. Click Reset to reset the image to its original settings.
- Adjust the image size.
The Source fields will tell you the dimensions of your original image.

- If you are scanning an image to be shown on a screen, select pixels from the units menu on the right.
- If you are scanning an image to be printed on paper, select inches from the units menu on the right. Additionally, you can also choose percent.
If you already know the dimensions that you would like your image to have, type them into the W and H fields in the Target section. You can also use the slider bar or click on the arrows to adjust the dimensions by percentage. The W and H boxes will change automatically.
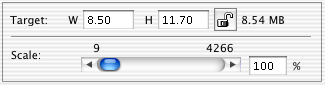
Note: It is better to scale the image now rather than after the image has been scanned. Scaling an image after it has been scanned will often result in lost quality (a fuzzy or more pixelated image).
Sizing: For displaying on a screen (for example: the web or powerpoint) images should not be larger than 800 x 600 pixels. The file size will increase as the dimensions increase so if possible, your dimensions should be smaller than this.
- Scan
- When you have selected all of the above settings and confirmed that you have selected the area that you want to scann, click Scan .
- The Epson Twain window may close automatically, but if it does not, click Close .
In Photoshop
- Your image should now be in an untitled window in Photoshop.
- Double-click the magnifying glass to see the image at full size.
- If the image needs to be rotated, from the Image menu choose one of the Rotate options. CW will rotate clockwise (to the right) and CCW will rotate counter-clockwise (to the left).
- If you'd like to sharpen your image, go the Filter menu in Photoshop, and choose Sharpen -> Unsharpen Mask . In the window that opens, choose the settings that look best in the preview window and click OK .
- When your image is finished you will need to Save your image
- Insert a floppy diskette or Zip cartridge, and from the File menu, select Save As .
- If you intend to print this scanned image on paper
- Save your image in Photoshop format.
- Name your image and click Save.
- If you intend to display this image on a screen
- Save in JPEG format.
- Name your image and click Save.
- Photoshop will prompt you for the image quality. For Image Options, set the Quality to 5 (Medium) . (You don't get much better image quality by choosing high or maximum, and your files will be unnecessarily large. The "Low" setting is not recommended.) Set the Format Options to Baseline (Standard) .